The value of the integration
Enhanced loyalty
Marketing automation and personalized messages enable webshops to engage visitors and customers with tailored content, creating a deeper connection and increased loyalty.
Improved customer experience
By sending timely and relevant messages based on real-time data, online stores can improve the overall experience by offering valuable information, promotions, and offers that match customer interests and needs.
Targeted communication
Advanced segmentation enables targeted communication, allowing webshops to reach specific target groups with personalized messages tailored to their demographics, preferences, and behavior.
Churn Prediction and Prevention
Marketing automation tools help identify members at risk of churn by analyzing their engagement and visitor behavior and enable proactive strategies to retain them through targeted campaigns and incentives.
Streamlined processes
By automating marketing processes and using personalized messages, webshops can streamline operations, save time and resources, and at the same time deliver relevant and impactful messages to their target audience.
Turn your webshop visitors into loyal customers. With the 2-way integration between Heyloyalty and Shopify, you can create effective email marketing and marketing automation based on data from your webshop.
Before you begin
To make it easier for you, we recommend that you read the frequently asked questions and find the various documents, IDs, login information, etc. that you will need for the setup. See more below.
Frequently asked questions
Do I need a developer?
No. But if you’re unsure about how to install an extension from the Shopify app, it might make sense to team up with a colleague.
How long does it take to finish setting up the integration?
Five minutes and a few minutes of preparation to find the items from the list below first.
Does the integration retrieve retroactive data?
Yes, if you just click a single button during setup.
Do I need access to other systems?
It’s easier if you already have an active account with Heyloyalty. However, you can create a Heyloyalty account during the integration setup, in which case you’ll need company name, first name, last name, email, phone number, and CVR number.
Which data is being imported?
Read the Fields in the integration section at the bottom of this page for the full overview.
Can I segment data that comes through the integration?
Yes. All data that comes through the integration can be used to segment your future communication. You can also use this data to start and stop your flows.
What you need to set up the integration
Do I need a developer? No
Can I set it up myself? Yes
You should have Heyloyalty and the Shopify shop open in separate tabs in your browser. In Heyloyalty, you’ll need the following
- If you have either Premium or Premium+ license in Heyloyalty:
Tracking integration from the aforementioned list
If you have a Basic license, you can ignore this
- API key (in Heyloyalty: Settings –> Account information –> API key)
- API secret (in Heyloyalty: Settings –> Account information –> API secret)
The integration operates via Shopify’s API and Heyloyalty’s tracking database. Read more about Tracking here.
Setting up the integration
With the above preparation, you’re now ready to set up the integration between Shopify and Heyloyalty.
Tracking (if your license is either Premium or Premium+)
Before you set up the integration to Shopify, you need to set up a tracking integration. You can read here how to set it up. In setting up the tracking integration, you need to choose which list tracking should be transferred to, since no list has been created from the integration yet, you should just use a temporary list. If you don’t have a list, you can read here how to create one.
Skip this step if you have a Basic license.
Set up Tracking by clicking on Integrations –> List Integrations –> Tracking –> Setup Integration –> Create new Tracking
Fill in the fields. Make sure that you add a product feed. The number of visits of category and the number of days visits exceed over are important to consider, as they have an impact on when a category interest will trigger. A rule of thumb – which can vary in quality depending on your customers’ typical purchase patterns and frequencies – is to set the Number of visits of category to three and the Number of days visits exceed can be seven.
Session time should be a number, and it should be the same as in your script. Typically, we recommend 45 minutes, so if you follow that recommendation, you should write 45 in that field.
Setting up the integration
Find the Heyloyalty app in Shopify. Log into Shopify –> Apps –> Add apps –> Explore more in Shopify App Store
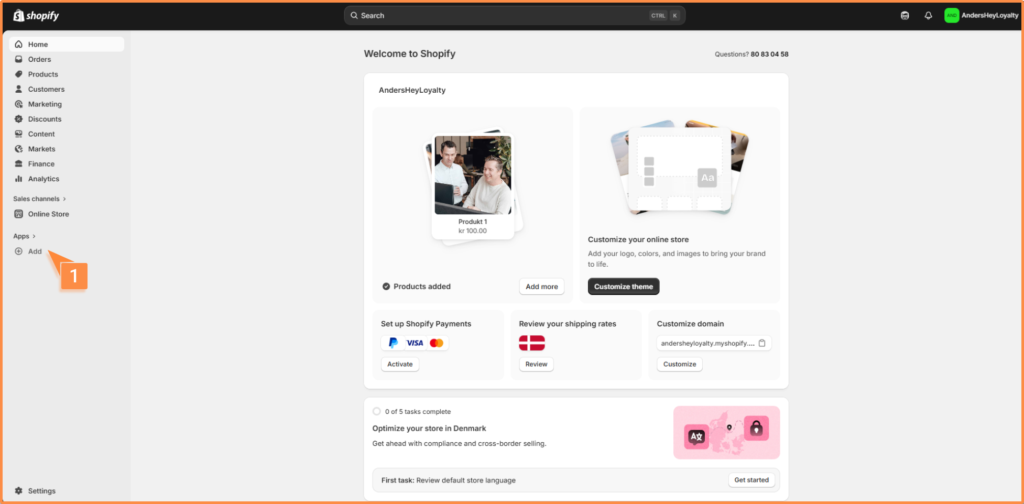

A new window opens.
Search for Heyloyalty and click Install. A new window opens again and now click Install.


A new window opens again.
Do you already have an account with Heyloyalty?
You now need to consider whether you have an active account with Heyloyalty or not.
You already have an account with Heyloyalty
Choose Click here to setup if you already have an active account.
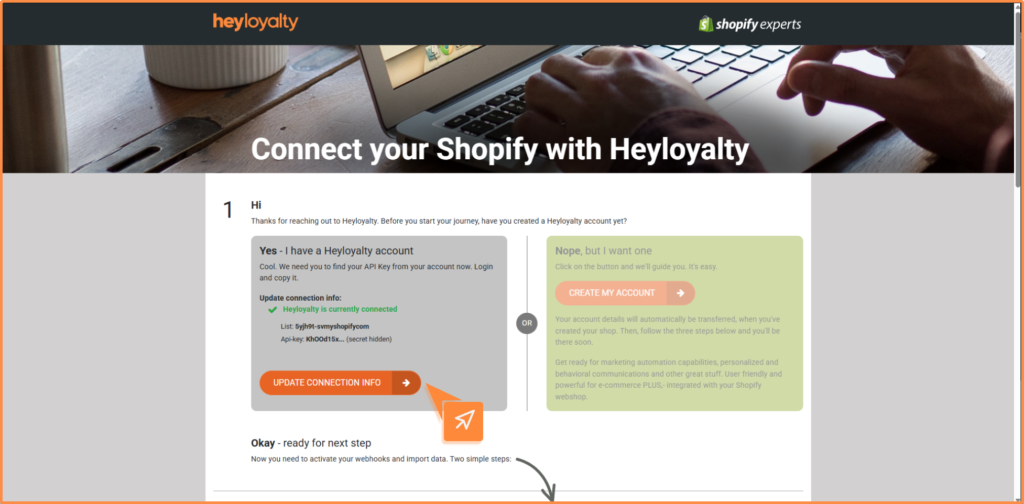
Log in by clicking Click here to log in and log into Heyloyalty to find your API key and API secret – you should have found these beforehand under the section What you need to set up the integration.
Fill in API Key and API Secret and finish with Save connection info.
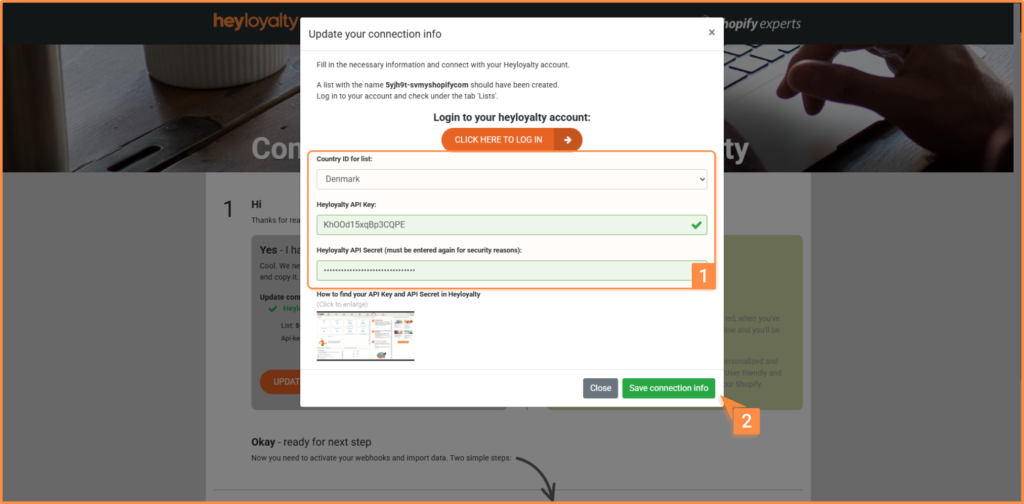
It’s now loading for a few seconds. When you see this message, you can click Close
Then go to Activate webhooks.
You don’t have an account with Heyloyalty
If you don’t have an active account with Heyloyalty, then choose Create my account and fill in the fields:
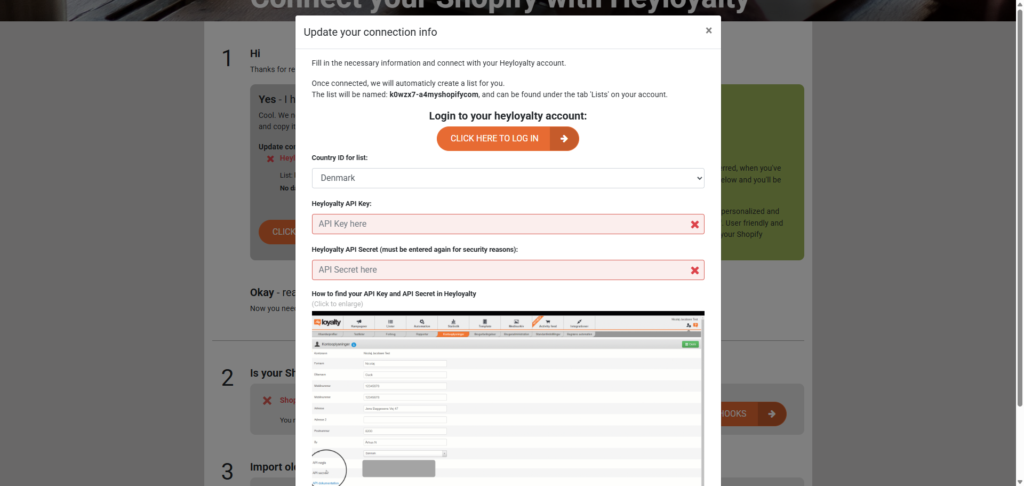
Activate webhooks
You now need to activate webhooks by clicking the button Activate webhooks.
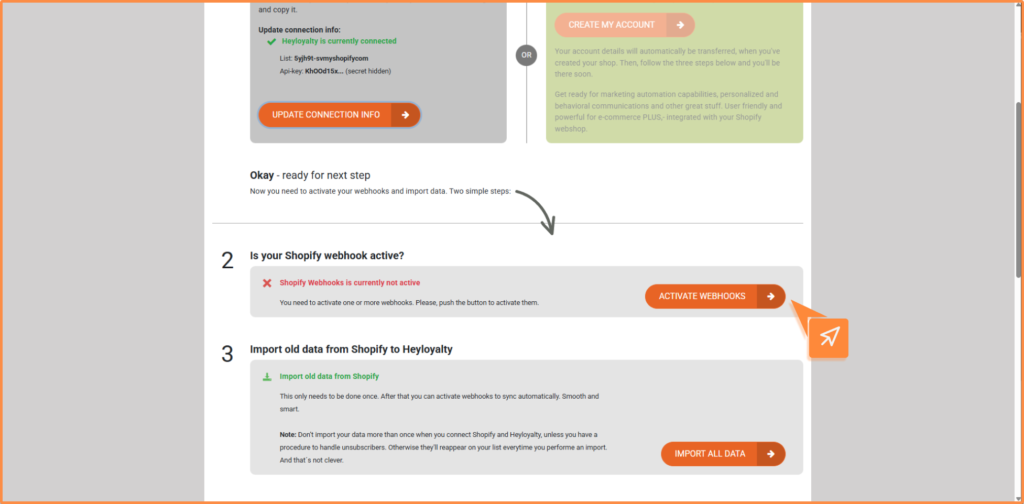
After this, you should be able to see the message Shopify Webhooks is active.
Importing historical data
To import historical data, simply click Import all data.
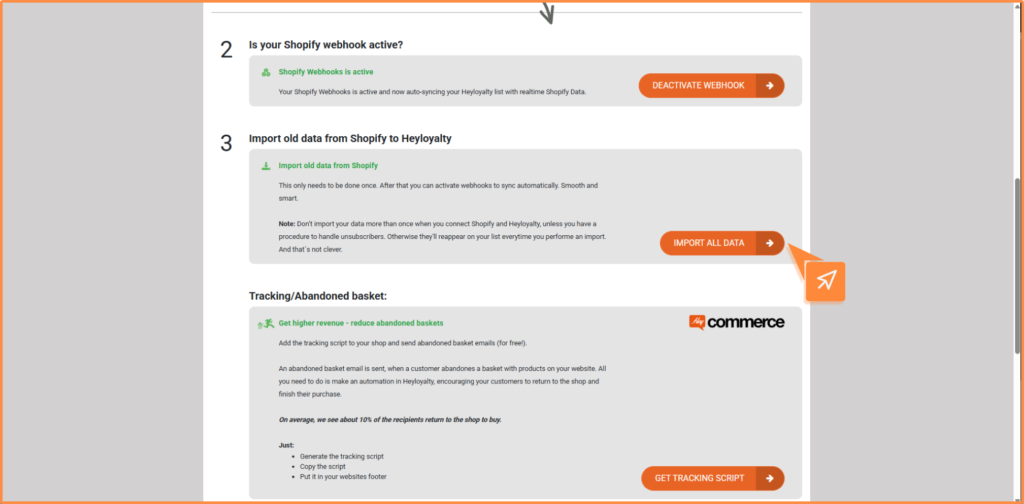
Depending on how much data you have in your webshop, it may take some time. However, the import is now in queue, and you can proceed to insert your tracking script.
Insert tracking script
For you to get data into Heyloyalty about which products your users visit, which products they add to cart, and which products they buy, you need to insert the following tracking script on your webshop.
APIKey can be found here in Heyloyalty:
User menu 👤⚙️ –> Account information –> API information –> API key
Tracking id can be found here in Heyloyalty:
Integrations –> List integrations –> Tracking –> Edit integration –> *Find your Tracking id in the fourth column*
(function () {
    // Helper function to generate a unique ID
    function generateUUID() {
      return 'xxxxxxxx-xxxx-xxxx-yxxx-xxxxxxxxxxxx'.replace(/[xy]/g, function (c) {
        const r = (Math.random() * 16) | 0;
        const v = c === 'x' ? r : (r & 0x3) | 0x8;
        return v.toString(16);
      });
    }

    // Helper function to get or set a cookie
    function getOrSetCookie(name, value, minutes) {
      const existingCookie = document.cookie.split('; ').find((row) => row.startsWith(name + '='));
      if (existingCookie) {
        return existingCookie.split('=')[1];
      }
      if (value) {
        const expires = new Date();
        expires.setTime(expires.getTime() + minutes * 60 * 1000);
        document.cookie = `${name}=${value}; expires=${expires.toUTCString()}; path=/;`;
        return value;
      }
      return null;
    }

    // Generate or retrieve the CookieID (persistent for 1 year)
    const HLcookieID = getOrSetCookie('HLcookieID', generateUUID(), 365 * 24 * 60); // 1 year in minutes

    // Generate or retrieve the SessionID (valid for 5 minutes)
    const HLsessionID = getOrSetCookie('HLsessionID', generateUUID(), 45); // 45-minute lifetime

    // Log the IDs for debugging
    //console.log('HLCookieID:', HLcookieID);
    //console.log('HLSessionID:', HLsessionID);
    const APIkey = "XXXXXXXX";
    const integrationId = "XXXXX";

    // Example: Dispatch a custom Shopify event with the IDs
    analytics.subscribe('page_viewed', () => {
      const eventPayload = {
        event_name: 'page_viewed',
        HLsessionID: HLsessionID,
        HLcookieID: HLcookieID,
      };
      //console.log('Custom Page Viewed Event:', eventPayload);

  });
  var productView = false;
  analytics.subscribe("product_viewed", event => {
  // Example: Send this data to an external tracking service (optional)
  const productId = event.data.productVariant.id;
  const url = event.context.window.location.href;
    productView = true;
  protocol = "https:" == document.location.protocol ? "https://" : "http://",
  source = protocol + 'tracking.heyloyalty.com/' + "visit" + '/' + APIkey + '?' + "cookie=" + HLcookieID + "&session=" + HLsessionID + "&integrationId=" + integrationId + "&productId=" + productId + '&url=' + url,
  xhr = new XMLHttpRequest();
  xhr.open('GET', source, true);
  xhr.send();

  if (url.indexOf("hlId=")>-1){
    const queryString = window.location.search;
    const urlParams = new URLSearchParams(url);
    const email = urlParams.get('hlId')

    protocol = "https:" == document.location.protocol ? "https://" : "http://",
    source = protocol + 'tracking.heyloyalty.com/' + "pairEmail" + '/' + APIkey + '?' + "cookie=" + HLcookieID + "&session=" + HLsessionID + "&integrationId=" + integrationId + "&email=" + email + '&url=' + url,
    xhr = new XMLHttpRequest();
    xhr.open('GET', source, true);
    xhr.send();
  }

});


  analytics.subscribe("page_viewed", event => {
    const url = event.context.window.location.href;
    //console.log(productView)
  if(productView){
    return
  }

  protocol = "https:" == document.location.protocol ? "https://" : "http://",
  source = protocol + 'tracking.heyloyalty.com/' + "visit" + '/' + APIkey + '?' + "cookie=" + HLcookieID + "&session=" + HLsessionID + "&integrationId=" + integrationId + '&url=' + url,
  xhr = new XMLHttpRequest();
  xhr.open('GET', source, true);
  xhr.send();
  console.log("side-set");

  if (url.indexOf("hlId=")>-1){
    const queryString = window.location.search;
    const urlParams = new URLSearchParams(url);
    const email = urlParams.get('hlId')

    protocol = "https:" == document.location.protocol ? "https://" : "http://",
    source = protocol + 'tracking.heyloyalty.com/' + "pairEmail" + '/' + APIkey + '?' + "cookie=" + HLcookieID + "&session=" + HLsessionID + "&integrationId=" + integrationId + "&email=" + email + '&url=' + url,
    xhr = new XMLHttpRequest();
    xhr.open('GET', source, true);
    xhr.send();
  }

});

  analytics.subscribe("product_added_to_cart", event => {
    const productId = event.data.cartLine?.merchandise.product.id;
    const url = event.context.window.location.href;
    const basketId = event.data.cartLine?.merchandise.id;
    const itemAmount = event.data.cartLine?.quantity;
    const categoryId = event.data.cartLine?.merchandise.product.type;

    protocol = "https:" == document.location.protocol ? "https://" : "http://",
    source = protocol + 'tracking.heyloyalty.com/' + "addtobasket" + '/' + APIkey + '?' + "cookie=" + HLcookieID + "&session=" + HLsessionID + "&integrationId=" + integrationId + "&productId=" + productId + "&amount=" + itemAmount + "&categoryId=" + "&basketId=" + basketId + '&url=' + url,
    xhr = new XMLHttpRequest();
    xhr.open('GET', source, true);
    xhr.send();

  });

  analytics.subscribe("product_removed_from_cart", event => {
    const productId = event.data.cartLine?.merchandise.product.id;
    const url = event.context.window.location.href;
    const basketId = event.data.cartLine?.merchandise.id;
    const itemAmount = event.data.cartLine?.cost.totalAmount.amount;
    const categoryId = event.data.cartLine?.merchandise.product.type;

    protocol = "https:" == document.location.protocol ? "https://" : "http://",
    source = protocol + 'tracking.heyloyalty.com/' + "removefrombasket" + '/' + APIkey + '?' + "cookie=" + HLcookieID + "&session=" + HLsessionID + "&integrationId=" + integrationId + "&productId=" + productId,
    xhr = new XMLHttpRequest();
    xhr.open('GET', source, true);
    xhr.send();

  });

  analytics.subscribe("checkout_completed", event => {
    const basketAmount = event.data.checkout.subtotalPrice?.amount;
    const url = event.context.window.location.href;
    const basketId = event.data.checkout.order?.id;

    protocol = "https:" == document.location.protocol ? "https://" : "http://",
    source = protocol + 'tracking.heyloyalty.com/' + "purchasebasket" + '/' + APIkey + '?' + "cookie=" + HLcookieID + "&session=" + HLsessionID + "&integrationId=" + integrationId + "&basketPrice=" + basketAmount + "&order_number=" + basketId + '&url=' + url,
    xhr = new XMLHttpRequest();
    xhr.open('GET', source, true);
    xhr.send();

  });

  })();
When you’ve inserted APIkey and IntegrationId, you’re now ready to insert the script on your Shopify shop. You insert the script by going to your Shopify shop and then settings:

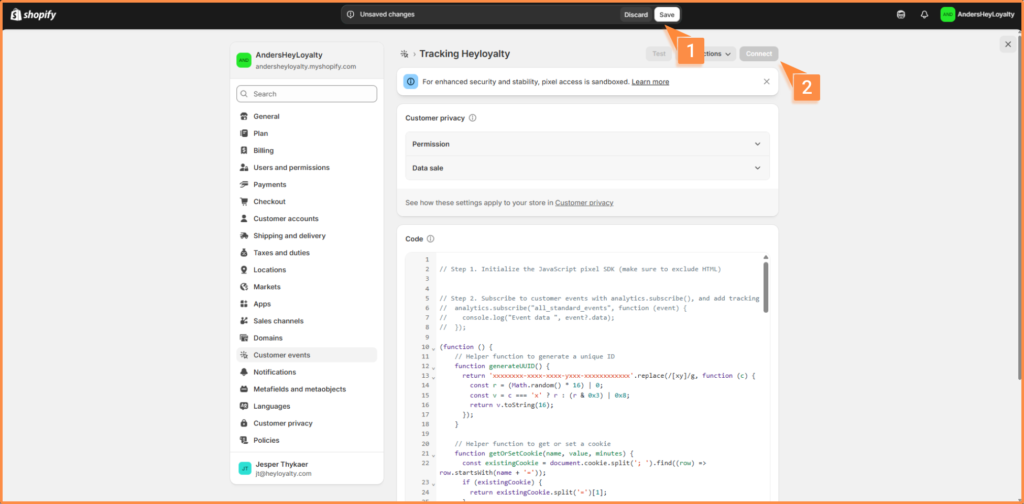
Then you need to go to Customer events –> More views –> Custom pixels and then click Add custom pixel:
Then you name your pixel. We recommend calling it Tracking Heyloyalty and then click Add pixel.
On this page, you can insert your tracking script under the field code:
When the script is inserted, you can save the script. When you’ve clicked save, you’ll subsequently be able to click Connect:
After the script is connected, you need to insert the newly created list from the integration on your tracking integration. You do this by going to: Integrations –> List integrations –> Tracking –> Set up integration –> Create new Tracking
When the list is changed, you can check if events are coming in from your webshop. You can see this under the activity feed, which you can find here: statistics > activity feed.
Products in your campaigns
To insert your products into your campaigns, you need a Shopify app that can generate a product feed. You may already have an app for this – if not, you can ask your web agency.
Alternatively, there’s a free module available here: https://apps.shopify.com/product-feeds-generator. Here you can generate a product feed.
When you’ve generated your product feed, you can set up the feed in Heyloyalty. You can read here how to set up your feed.
General information about integration
Worth knowing about the integration
When the integration is set up, you can retrieve all historical purchase data with a single click.
Heyloyalty creates a contact when a contact is created in Shopify who has said yes to receiving the newsletter.
- The contact is automatically updated in the Tracking database. This means that you can, among other things, segment on whether the contacts in Heyloyalty have purchased within the last seven days or not, have purchased for more than a given amount or have purchased more than a certain number of times, to name just a few of your options.
- Data is tracked on unknown members, and when an unknown member subscribes to the newsletter, Heyloyalty automatically makes a retroactive pairing of all this person’s data, so you get the complete history when a member subscribes to the newsletter
Fields in the integration
If you want a complete overview of the fields in the integration, you can see it in the fields in the list you have connected the integration to.
Lists –> ⋮ –> Edit list. Scroll down to the bottom and see all the custom fields that are on the list and that you’ve mapped as part of the integration.
Hvis du mangler information eller hjælp, som du ikke finder her på guide sitet, er du altid velkommen til at kontakte vores support!
support@heyloyalty.com / tlf. 87 300 399
Leave a Reply