In this guide, you will get an overview of the Navipartner integration between Business Central (BC) and Heyloyalty. The guide explains both the value of the integration and shows you, step by step, how to set up synchronization of member and purchase data, including two-way integration, webhooks, and tracking.
Once the integration is set up, you will have a solid foundation for working data-driven with segmentation, marketing automation, and personalized communication in Heyloyalty.
The value of the Navipartner integration
Unified customer data across webshop, BC and Heyloyalty
With the integration between Navipartner, BC and Heyloyalty, your customer data is collected in one place. Member and contact information is automatically synchronized between the systems, so you always work with updated and consistent data across your webshop, BC and your email platform.
Marketing based on purchase history
All purchases and transactions from your Navipartner webshop are transferred to Heyloyalty. This gives you a strong data foundation to work with segmentation, campaigns and marketing automation based on real purchase behavior – e.g. recent purchases, visits, ticket data and transaction history.
More relevant and targeted communication
By combining member data and purchase data, you can send more relevant and personal messages to your customers. Advanced segmentation options make it possible to target communication based on e.g. membership status, engagement, purchases, visit history and preferences – and thereby increase the effectiveness of your campaigns.
Streamlining and automation of processes
The automation between Navipartner, BC and Heyloyalty reduces manual work and minimizes the risk of errors. At the same time, it frees up time in everyday work, as updates, synchronization and data transfer happen automatically – without the need for manual imports or double registration.
Ready for marketing automation and personalized flows
With the integration in place, you have the foundation to build automated flows in Heyloyalty, based on both member data and purchase behavior. This could be e.g. welcome flows, follow-up after purchases, reactivation of inactive customers or personalized campaigns – completely without manual work.
Integration specifications
Navipartner has developed most of the integration between Navipartner, Business Central (BC), and Heyloyalty. The integration supports the following functionality:
- Two-way synchronization of member information between BC and a Heyloyalty list.
- Tracking receives ticket sales and transactions from BC and sends them to Heyloyalty’s tracking database.
We retrieve data from Navipartner’s endpoints, which are called:
- Member endpoint
- Member card endpoint
- Ticket endpoint
- Ticket Access Entry endpoint
After setup and data import, the integration will run continuously:
- The integration retrieves members and order data.
- Member data is retrieved from Heyloyalty and sent to BC via webhook. Member data will therefore be sent in real time.
- Order data is sent from Navipartner to Heyloyalty via webhook. Order data should therefore be visible immediately in Heyloyalty.
- Setting up the Navipartner integration between Heyloyalty and Navipartner
Step 1: Set up Microsoft Entra ID
For Heyloyalty and Navipartner to communicate, a Microsoft Entra ID application must be created. This ensures that Heyloyalty can update data in Business Central (BC).
You can read Navipartner’s guide on how to set up the Microsoft Entra ID application.
Step 2: Set up two-way integration for member data
You can configure your BC and Heyloyalty accounts to synchronize changes to member-related data. This means that new member details and changes made by existing members in BC are automatically sent to Heyloyalty — and vice versa.
Before you begin, make sure the following is in place:
- Ensure member data mapping is in place. Clarify which Heyloyalty fields should be used in the synchronization process and which BC fields they should be mapped to.
- Find your API key and API secret in your Heyloyalty account. These are available under Account information in the user menu.
Once the above is in place, follow Navipartner’s user guide to set up the two-way integration.
After following Navipartner’s guide, you must create the necessary fields on your list in Heyloyalty so the system can receive all relevant data from BC. If you have not yet created a list, you can read here how to create one.
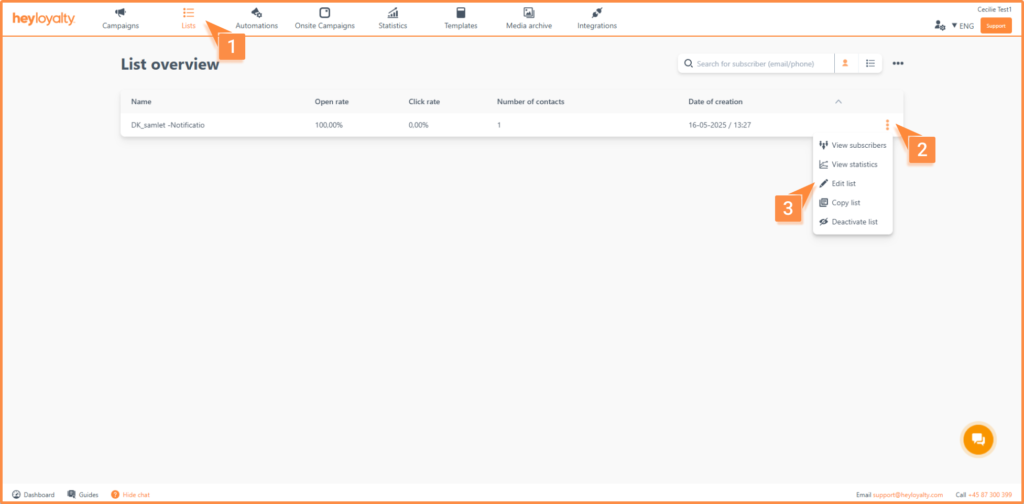
To add fields to the list, go to Lists, click the three dots (•••) next to your list, and select Edit list. Then create the list with all the default fields below, so it looks as shown.
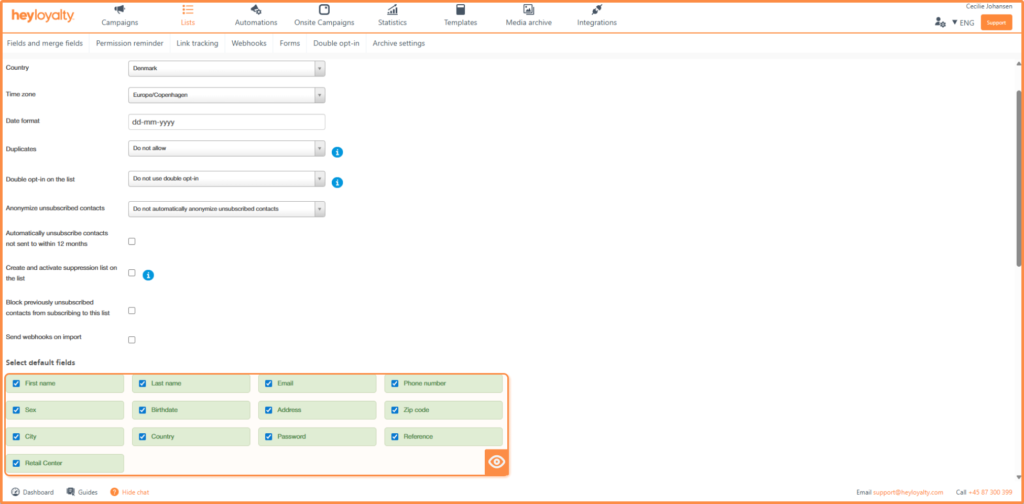
In addition, customer fields must be created, which can be added at the bottom of the Edit list page. The fields below must be created. We have provided recommended input, but this may vary from customer to customer. See below which fields we recommend:
| Field name | Recommended type | Recommended input |
| Membership code | Single-choice option | Insert the membership codes that exist in BC |
| Medlemsstatus | Single-choice option | Active member, newsletter subscriber, former member (or other options you have in BC) |
| Permission | Multiple-choice option | Notification, newsletter |
| Medlemstype | Text | |
| Besøgsdag | Single-choice option | Mandag, tirsdag, onsdag, torsdag, fredag, lørdag og søndag |
| Børn | Single-choice option | Visiting with children / Visiting without children |
| Item no | Number | |
| Sidste besøg | Single-choice option | Set the options to the types that exist in BC |
| Medlemskab aktivt | Yes/No | |
| Medlemskab slutdato | Date | |
| Medlemskab aktiveringsdato | Date |
Permission
Under Permission, we recommend creating the values Notification and Newsletter, so your members can be split into two lists:
- Notifications: All contacts who have made a purchase.
- Newsletter: All contacts who have given consent to receive the newsletter. This includes contacts who signed up via purchases, signup forms, Facebook, Sleeknote, etc.
All members will be created on one list through integration. If you want to separate your permissions, you must set up automation flows to ensure that contacts with Newsletter permission are automatically placed on the Newsletter list. In addition, automation flows must be created to continuously update the member’s permissions on the Newsletter list.
Step 3: Heyloyalty webhook
To ensure that changes made directly to members in Heyloyalty are synchronized back to BC, you must create a webhook in Heyloyalty.
Once this is in place, you are ready to set up the webhook. First, generate your webhook URL by following Navipartner’s guide described in the section Procedure in Business Central.
When the webhook URL has been created, configure the webhook in Heyloyalty by going to Lists and selecting Edit list.
Then select Webhook > Create a webhook.

When you click Create a webhook, you will be taken to the webhook settings. Fill in the fields shown on the page. Below is a recommended standard setup:
| Field name | Recommended input |
| URL | Recommended input |
| Contact email | Email address of the person who should receive webhook error |
| Send as raw JSON object | Yes |
| Simplified format | Yes |
| Authentication type | OAuth 2.0 |
| Username | The Application ID (client ID) from the Azure AD application details page shown at the end of “Set up Microsoft Entra ID” |
| Password | Client Secret from the Azure AD application details page in BC |
| base URL | https://login.microsoftonline.com/<Your BC tenant ID>/oauth2/v2.0 |
| scopes (optional) | https://api.businesscentral.dynamics.com/.default |
| Tilmeld medlem (e-mail, mobil) | Yes |
| New subscriber (Webpush) | Yes |
| Update subscriber | Yes |
| Unsubscribe subscriber | Yes |
| Spamklage | Yes |
| Click (when a subscriber clicks in an email) | No |
| Opening (when a subscriber opens an email) | No |
| Hard bounces (when a subscriber’s email address hard bounces) | Yes |
| Anonymized subscriber | No |
| Sent (when a subscriber receives an email) | No |
| Send a reply back at transactional emails | No |
Step 4: Set up tracking integration and product feed
For at kunne få købsdata ind i Heyloyalty og oprette automationsflows og segmenter baseret på køb, skal du have oprettet en tracking-integration. Du kan læse her, hvordan du opretter en tracking-integration.
For at sikre, at alt købsdata fra BC overføres til Heyloyalty, skal du opsætte brugerdefinerede trackingfelter. Disse opsættes under Integrationer → Listeintegrationer → Rediger tracking-integration –> klik på de tre prikker og select Add custom fields:
Here you must create a tracking list with fields. If you choose to split your members’ permission, we recommend creating a tracking list for both Newsletter and Notification with the same fields. Add the tracking fields here:
Add the tracking fields here:
We recommend adding the following fields to your tracking list:
| Field name | Field type |
| First visit | Date |
| scheduled_admission | Date |
| Latest visit | Date |
| Ticket admission date and Time | Date |
| Ticket valid to time | Date |
| Ticket_scanned | Yes/No |
| Ticket_time_Slot | Date |
| Ticket_type | Text |
| Exhibition name | Text |
Afterwards, you will be able to see purchase data under the activity feed, which you can find under statistics > activity feed.
Product feed
To insert a product in your campaign, you must create a product feed. Here you can read how to create a product feed. (MANGLER LINK)
Kom i gang med Navipartner integrationen
Du har nu styr på fundamentet i din Navipartner-integration mellem BC og Heyloyalty. Med integrationen på plads synkroniseres medlems- og kontaktdata på tværs af systemerne, og dine køb og transaktioner fra webshoppen registreres automatisk i Heyloyaltys trackingdatabase.
The integration provides a strong data foundation for working data-driven with your customers — from the first purchase to repeat visits and long-term relationships. When data from Navipartner, BC, and Heyloyalty work together, new opportunities open to automate communication, target campaigns, and create more relevant customer experiences.
The next step is to start using the possibilities in practice
Set up your first automation flows, create segments based on purchases and member data, and adjust field mapping and tracking fields to match your business. Often, it’s the small adjustments that create the most value — for example, a welcome flow, post-purchase follow-up, or targeted communication to your most engaged customers.
Remember that the integration can evolve as your needs change. You can continuously expand with new data points, adjust to synchronization, and build more advanced automations as you gain deeper insight into your customers’ behavior.
Didn’t find what you were looking for? You are always welcome to contact our support at support@heyloyalty.com—we’re ready to help.
Leave a Reply