The value of integration
Enhanced loyalty
Marketing automation and personalized messages enable webshops to engage visitors and customers with tailored content, creating a deeper connection and increased loyalty.
Improved customer experience
By sending timely and relevant messages based on real-time data, online stores can improve the overall experience by offering valuable information, promotions, and offers that match customer interests and needs.
Targeted communication
Advanced segmentation enables targeted communication, allowing webshops to reach specific target groups with personalized messages tailored to their demographics, preferences, and behavior.
Churn Prediction and Prevention
Marketing automation tools help identify members at risk of churn by analyzing their engagement and visitor behavior and enable proactive strategies to retain them through targeted campaigns and incentives.
Streamlined processes
By automating marketing processes and using personalized messages, webshops can streamline operations, save time and resources, and at the same time deliver relevant and impactful messages to their target audience.
Turn your webshop visitors into loyal customers. With the 2-way integration between Heyloyalty and Dandomain Webshop, you can create effective email marketing and marketing automation based on data from your webshop.
Before you begin
To make it easier for you, we recommend that you read the frequently asked questions and find the various documents, IDs, login information, etc. that you will need for the setup. See more below.
Frequently Asked Questions
Do I need a developer?
No.
How long does it take to finish setting up the integration?
Depending on how well you know Heyloyalty and DanDomain, it probably takes somewhere between 10-30 minutes.
Does the integration retrieve backward data?
Yes.
Do I need access to other systems?
You must have access to Heyloyalty – and your Heyloyalty account must be active.
You must also have access to the DanDomain backend.
What data is being imported?
Read the Fields in the integration section at the bottom of this page for the full overview. As a starting point, all behavioral data from the webshop is included as well as all purchase data.
Can I segment data that comes through the integration?
Yes. All data that comes through the integration can be used to segment your future communication. You can also use this data to start and stop your flows.
What you need to set up the integration
You should have Heyloyalty open in one tab.
- A tracking integration Read more about Tracking here
- Open the DanDomain backend in another tab.
The integration operates via Dandomain Webshop’s API and Heyloyalty’s tracking database. Read more about Tracking here
Setting up the integration
With the above preparation, you are now ready to set up the integration between Dandomain Webshop and Heyloyalty.
Create API client
Set up the API in your Dandomain Webshop via Settings –> API –> Create API client –> Enter a name. The name is secondary and for your own use only. You can possibly just call it Heyloyalty. Finish with Save.

Enable API:SOAP access in your Dandomain Webshop via Settings –> API:SOAP –> tick.

Create employee
Use your own user profile or create a new ‘fictitious employee’ (or a dummy user) that is linked to the integration. Please note that if this user is deleted at some point, the integration will stop working until a new employee in Dandomain Webshop is connected to the integration.
Set up or create the employee in your Dandomain Webshop via Settings –> Employees –> Create employee –> Fill in the information. For Application access, the employee must have access to the API (Has access to the SOAP API).

Finish with Save.
Create or use product feed
The integration automatically downloads your Google Shopping Ads price portal – i.e. your product feed.
Double-check that this price portal is active via Sales channels –> Price index –> Google Shopping Ads. Make sure there is a check mark in Active and finish with Save.

Create the integration in Heyloyalty
Now you open Heyloyalty.
Integrations –> Integrations –> Integrate with HostedShop –> Set Up Integration

Fill in the information. The Email and Password must be the email and password of the employee you created or used above in the section Create employee.
You will find the shop ID in the top right corner when you are logged in to your backend on Dandomain Webshop. An example of a shop id is shop123456.
Subscriber distribution is recommended to be on Overall on a list. This will make it easier for you to manage your members in the future and avoid duplicates.
Double opt-in to the lists is left on Do not use double opt-in. This can be changed in the settings on the list afterwards, but for now, you need to leave it on Do not use double opt-in, because the integration will automatically retrieve all your members who have signed up for your newsletter.
Avoid subscribing currently unsubscribed member, you also leave the page Fetch unsubscribed members and add them to list, because a customer may have unsubscribed by mistake, or wants to hear from you again.
In Shop settings, fill in four fields.
- API ID and API secret
Available in the Dandomain Webshop backend:
Home –> Settings –> API –> Tap on the name of the API client in the ‘Set up API’ section.

- ID for orderstatus: bought (You can read the default values in the next paragraph, but if you haven’t changed the default settings, you can simply move on to the next step)
- ID for orderstatus: annulled (You can read the default values in the next item, so if you haven’t changed the default settings, you can simply move on to the next item)
The different IDs for order status can be found in Dandomain Webshop here:
Settings –> Store settings –> Orders –> Create and edit order status

By default, the order status for purchases is 1, 2, 3, 4, 6, 7, 8 and for cancelled it is 5.
For purchases, look for the following order statuses: Ordre modtaget, Under behandling, Afsendt, Klar til afhentning, Delvist afsendt og Afhentet:
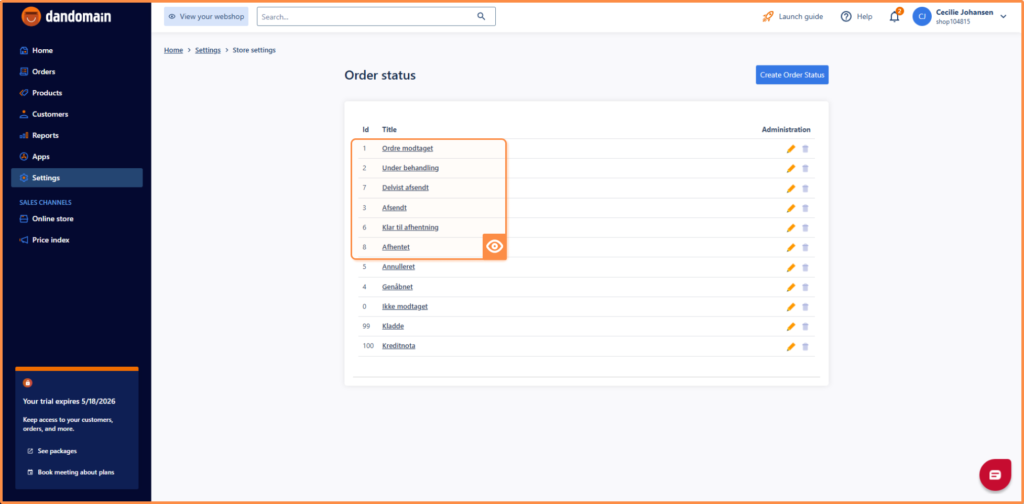
For order status cancelled, look for Canceled, which in the above screenshots is 5 (which is the default).
This means that the integration page in Heyloyalty is filled in something like this:

Your integration is now ready and will fetch all future transactions from Dandomain Webshop.
Create Tracking in Heyloyalty
Set up Tracking by clicking on Integrations –> List Integrations –> Tracking –> Setup Integration –> Create new Tracking.
Fill in the fields.
If you need help filling in the fields, read this guide
Remember to change Connect your HostedShop transactional data to Yes. You can only do this if you have a Premium license. If you have a Basic license, then you have to leave it at No.
Create Script for Tracking
Create your tracking script by visiting the https://tracking.heycommerce.dk/gettrackingscript page.
Leave the field Hvilken webshop har du i dag on Smartweb.
Select the session time, type the same number you selected in the previous point. The standard will be 45.
Then you need to have your API key in Heyloyalty, you can find it in Heyloyalty via Settings –> Account Information –> API key (copy the entire API key).
Paste the copied API key and press Create tracking script.
A script is now being generated. Copy the entire script (including the line break at the top and indents).
Implementation of tracking in DanDomain Webshop
Paste the newly copied script as Javascript into your DanDomain Webshop backend.
Find it by logging in to DanDomain Webshop — > Sales channels –> Online Store –> Design –> Actions –> Insert Javascript –> Page content (bottom)


Finish with Save.
General information about integration
Worth knowing about the integration
Once the integration is set up, Heyloyalty fetches all historical purchase data on the members that are created.
If a customer has purchased four times in your webshop but only chooses to sign up for the newsletter in connection with the fifth purchase, then this person will be created with five orders attached.
Fields in the integration
If you want a complete overview of the fields in the integration, you can see it in the fields in the list you have connected the integration to.
Lists –> ⁝ –> Edit list. Scroll down to the bottom and see all the custom fields that are on the list and that you have mapped as part of the integration. The integration creates Post nummer, Kunde id, Kunde type, Brugergruppe. These fields must not be changed or deleted!
It will be through Tracking that you can segment on e.g. last purchase date or have purchased for at least x kroner.
Hvis du mangler information eller hjælp, som du ikke finder her på guide sitet, er du altid velkommen til at kontakte vores support!
support@heyloyalty.com / tlf. 87 300 399
Leave a Reply